Disk write performance on Azure Functions
Series
This post is part of my Advanced Azure Functions series (thanks for the idea, Loïc!)
- How to run a distributed scan of Table Storage - 10 minute limit and Table Storage
- Disk write performance on Azure Functions - this post
- Run Azure Functions on Virtual Machine Scale Sets - save $$$ on Functions
Introduction
Latest update: 2021-04-26, added App Service plan performance. See the bottom of the post.
For one of my side projects, I’ve used the disk available on Azure Functions for temporary storage. Some code that
processes .NET Stream objects requires a seekable stream. If you are downloading bytes from a remote endpoint, e.g.
the response body by an HTTP request, the stream will not be seekable so you need to buffer it somewhere for processing.
If the stream is small enough, it can fit in memory, such as in a MemoryStream. But what if you’re in an environment
that has rather limited memory or what if the data is just too large to fit in memory? Well, in such a case using a
FileStream or some other stream based on a persistent store is required.
In my case, I am unzipping ZIP files
(requires a seekable stream)
and reading assembly metadata using System.Reflection.Metadata
(requires a seekable stream).
Also, I am running my code in Azure Functions Consumption plan which only has 1.5 GiB of memory and the data I’m working with often exceeds the memory limits, especially when a single Azure Function node is handling multiple function invocations.
The disk space on Azure Functions Consumption plan for Windows is a bit strange. The disk that is local to the node
running your function (not shared with other nodes) seems to have roughly 500 MiB of disk space from my experiments.
The easiest way to write to this local storage is by looking at the TEMP environment variable or by using
Path.GetTempPath. In my experiments, this resolved to C:\local\Temp.
However, when you provision a Consumption plan Function App, you also get an Azure File Share which allows all of your
function invocations to share a disk as well. I think the primary purpose for this share is to hold your app code, but
you can use it for other things since it’s just another storage account in your subscription.
The way you locate the mounted file system location is by looking at the HOME environment variable. In my experiments,
this resolved to C:\home.
Regarding how much space is in each location, disk space limitations/quotas can be set at the directory level so you
need to P/Invoke
GetDiskFreeSpaceEx to get
the actual quotas in these two writable directories. .NET’s
DriveInfo.AvailableFreeSpace
only shows the capacity at the root of the drive, which is not a writable location for the Azure Function app code.
In short, the local disk is fast but very limited. The share is not as fast but nearly unlimited in capacity (5 terabytes is the default limit).
The surprising thing is that the buffer size used when writing to the Azure File Share has a huge impact on your write performance. In many cases, stream APIs in .NET have default buffer sizes that are not ideal for working with Azure File Shares, at least in the context of Azure Functions Consumption Plan which is all that I tested.
I’ve made the following discoveries!
Use TEMP if you can, fall back to HOME
As mentioned above, try to use the TEMP directory which is on the Azure Function’s limited, local disk when
possible. There’s not much space there but it is measurably faster. Also, you don’t get charged for Azure File Share
data transfer and write transaction prices
(pricing for the default “transaction optimized” tier).
That’s not too surprising though since the Azure File Share is backed by network operations
whereas the local storage is presumably a physical disk available to host running Azure Functions. Here are the write
speeds when using a simple CopyToAsync where the source is a non-seekable stream.
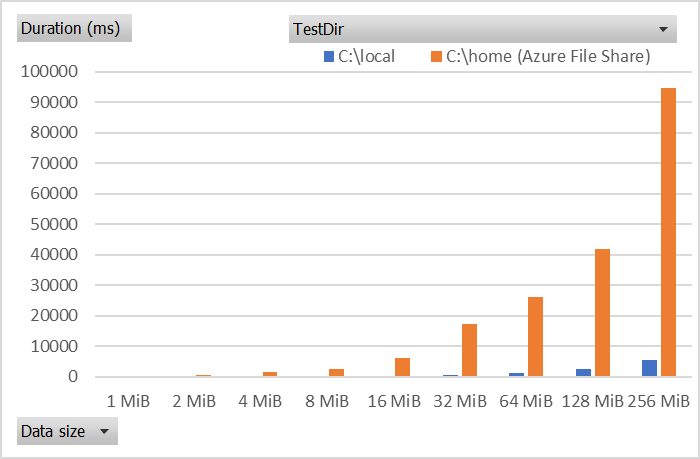
Note that I made my test code use a non-seekable stream since copying from a vanilla MemoryStream to a FileStream
uses a clever trick to set the length of the destination
(source)
which, as you’ll see below, provides its own performance win but not be done for unseekable source streams.
As mentioned above, I was interested in testing non-seekable source streams.
Avoid using Stream.CopyToAsync for big files
Let’s talk a bit about the base Stream.CopyToAsync implementation. The default buffer size for .NET Framework is a
static 80 KiB. On .NET Core, the copy buffer is fetched from the ArrayPool<byte>.Shared pool so the 80 KiB
(source)
is rounded up to the next power of 2, which is 128 KiB (source).
This is a pretty small buffer considering a network operation may need to be performed every time a chunk of bytes is
written to the Azure File Share.
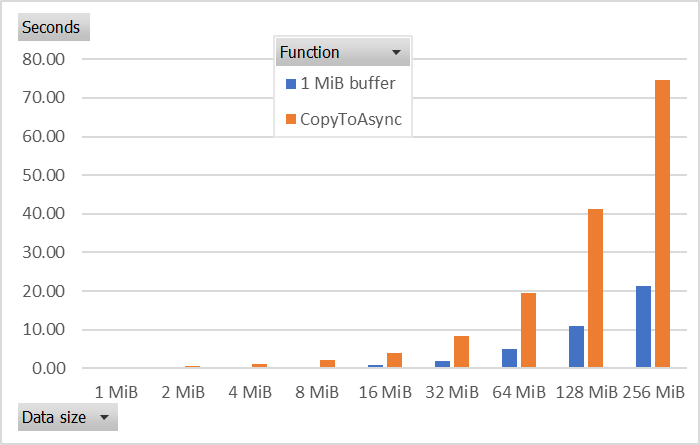
Consider an alternative where you perform the ReadAsync then WriteAsync yourself. This allows you to use any buffer
size you want and even perform additional tasks on the buffered bytes, such as hash/checksum calculation.
In this chart, you can see that a 1 MiB buffer improves the write performance by over 4 times compared to the default buffer size.
Bigger buffers are better, but don’t go crazy
So we see that using a buffer size larger than the default 80 KiB/128 KiB can be beneficial. How big of a buffer should we use when writing to Azure File Share?
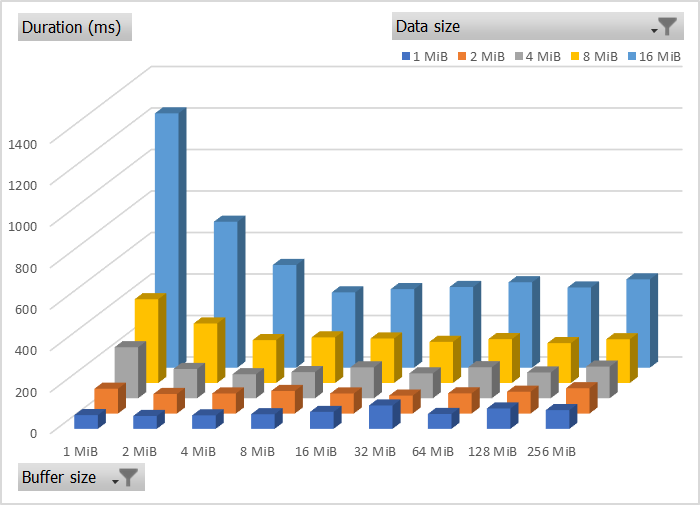
I tested all combinations of data sizes and buffer sizes for 1 MiB, 2 MiB, 4 MiB, … up to 256 MiB. Yes, I tested using a 256 MiB buffer on a 1 MiB payload because… science!
In this chart you can see that a 16 MiB buffer performs the best for a 256 MiB file, beating the 1 MiB buffer by a factor of 5x and the 256 MiB buffer by 4x. A similar pattern is seen for 32, 64, and 128 MiB data sizes.
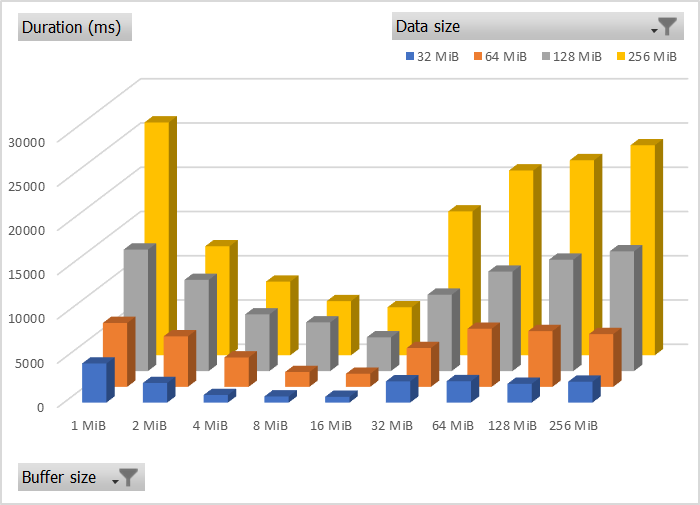
The first thing that can be safely concluded is that for large data sizes, using a buffer size that the same size as your data is not a good idea. This is kind of obvious considering the purpose of copy buffers…
For my code, I will probably be using a 4 MiB buffer since it’s pretty close to the 16 MiB buffer in performance but is a bit easier on the memory pool in a constrained environment like Azure Functions Consumption plan. Interestingly, the Azure.Storage.Files.Shares package seems to use a 4 MiB buffer as well. I won’t give myself the pleasure of saying “great minds think alike”.
For smaller data sizes, having the mega buffers didn’t seem to make things too much worse, probably because many of these data points all fall in the category of “buffer is larger than data” so internally the same number of write operations was likely being performed. In other words, the only bad thing about using a 256 MiB buffer on 16 MiB data is that it wastes a lot of memory. It’s not significantly slower from my measurements.
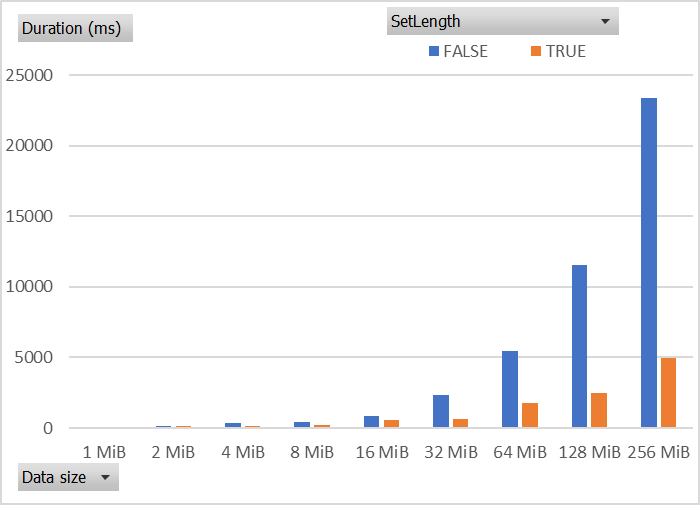
Call SetLength on the destination stream
If you know the length of the source bytes in advance (perhaps via source Stream.Length or some other way), you can
further improve the write performance to the Azure File Share by invoking FileStream.SetLength on destination stream.
From my tests, this can improve the write performance by a factor of 2x to 4x, where the bigger wins occur on the bigger data sizes.
Use a buffer larger than the FileStream internal buffer
This is a small thing, just to avoid a bit of unnecessary copying and allocation.
When the buffer provided to FileStream.WriteAsync exceeds the length of the internal FileStream
buffer, this skips an internal buffering operation (source).
As you saw below, bigger buffers are better so the default buffer size of 4096 bytes
(source)
should be always be bypassed. As a little bonus, this eliminates the unnecessary allocation of that buffer and you can
pool your write buffer with something like ArrayPool<byte>.Shared.
In short, using the default 4 KiB for the FileStream constructor is a good idea since your write buffer will nearly
always exceed the internal buffer size (both if you write your copy routine or if you use CopyToAsync).
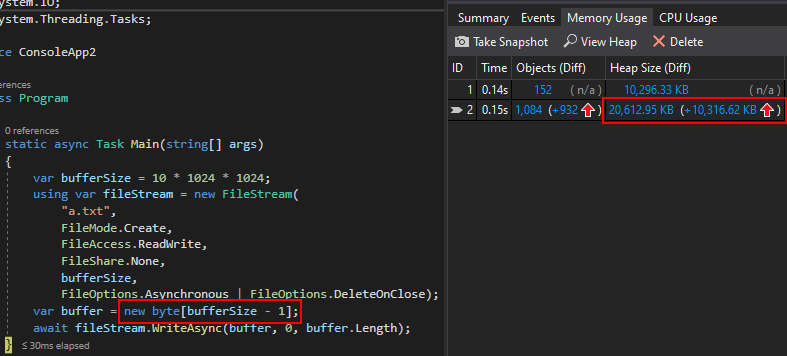
Here are the allocations when the WriteAsync buffer is smaller than FileStream buffer:
Here are the allocations when the WriteAsync buffer is larger than FileStream buffer:
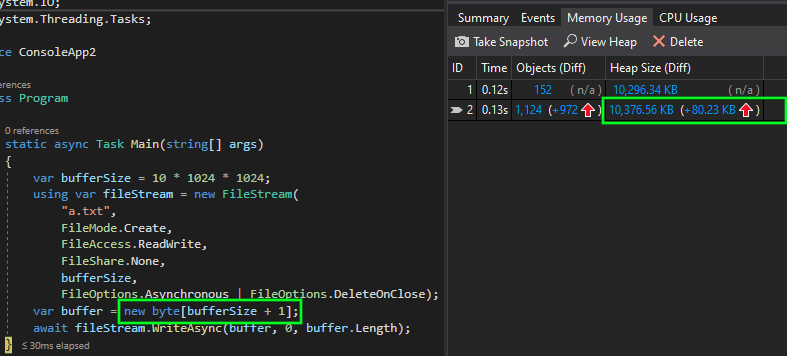
Note the rougly 10 MiB difference in allocation, caused by the internal buffer in FileStream.
Closing notes
With all of these tricks combined, you can get up to 10x write performance gain when writing to an Azure File Share.
Specifically, for a 256 MiB file, my custom implementation took 6.1 seconds but CopyToAsync with a non-seekable
source stream takes 73.1 seconds. Note that the SetLength trick was applied to the “custom” function but it could
be used for CopyToAsync to have a big win. I’m just trying to compare the most naive implementation with the most
advanced one 😃. The buffer size I used for the “custom” function was 4 MiB.

I did not test read performance because I have found that it is very much dependent on the code that is doing the read. Many read implementations have their own buffering strategy or only read specific parts of the stream so it’s hard to make any useful, broad statements. For write performance, however, I can test the useful “copy the whole thing to disk” pattern which will likely be used any time some byte stream does not fit in memory. Subsequent reads on those downloaded/copied bytes will vary in performance based on the scenario.
Feel free to try the performance tests yourself with your own data sizes. I have the code for both the test Azure Function and the test runner console app as well as the data files (Excel) on GitHub: joelverhagen/AzureFunctionDiskPerf.
Update: App Service plan measurements
Update 2021-04-26: I ran a similar test on the App Service plan for Azure Functions and have the following findings:
HOME- 50 GiB capacityTEMP- 11 GiB capacity
This is the write performance comparison between the two:
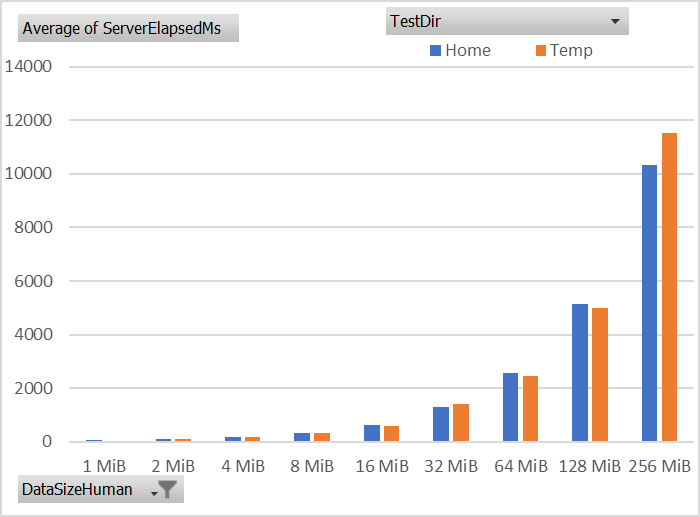
Give the capacity being many GiB in both cases and the performance being similar, I will probably use TEMP since
it’s more likely to be safe to clean up every so often.