How to compile TagLib on Windows
So, for my music tagger program, I need to build TagLib. For a C++ noob like me, this was a bit of a challenge. I first tried using CMake to build MinGW make files as suggested on TagLib's website and then building with plain old mingw32-make, but the binaries I ended up generating caused my Qt app to crash instantly on startup. I'm not sure why this was going on, but I know that these same TagLib binaries worked in a Code::Blocks project just fine. Oh well, I found another way to get things to work. Just so you know, I am compiling TagLib on Windows 7 Ultimate (64-bit).
Let's build TagLib inside QtCreator 2.0.1 on Windows! Note, you'll still need to use CMake to generate the Taglib config headers (I'll talk more about this later).
If you're a lazy boring person, then you can try download the binaries I built. To use them in one of your projects, you'll still need to get the TagLib headers.
Make sure you have QtCreator with MinGW installed. I am assuming you already have this done.
Download TagLib
- Go to the TagLib website and download the source code. The version I got was 1.6.3.
- Extract the archive you downloaded to a permanent location. This is the location that you want your programs to be able to read from after you've finished compiling the library.
- Throughout this tutorial, the location of source code is D:\Libraries.
- After you have extracted everything, the base directory of TagLib should look like this.
Install CMake
CMake is a cross-platform make program. We will use it in conjunction with QtCreator to build TagLib.
- Download the Windows installer for CMake from the website. I used the Windows (Win32 Installer) (version 2.8.3). Install CMake using the installer.
- Open up the CMake GUI.
- Set the Where is the source code field to the base directory of TagLib. This should be the folder with the subdirectories admin, bindings, cmake, doc, examples, taglib, and tests along with a bunch of other files.
- Set the Where to build the binaries to the same location as the previous step.
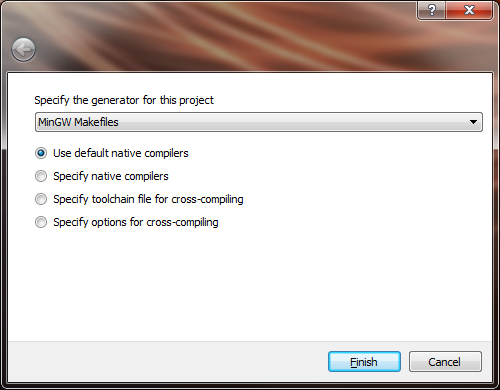
- Press the Configure button. A window should come up asking which generator you would like to use. Choose MinGW Makefiles (screenshot) and hit Finish.
- If it looks like CMake cannot find the MinGW compiler, add the mingw/bin directory installed with Qt to your PATH (the directory I added to my path was C:\Qt\2010.05\mingw\bin)
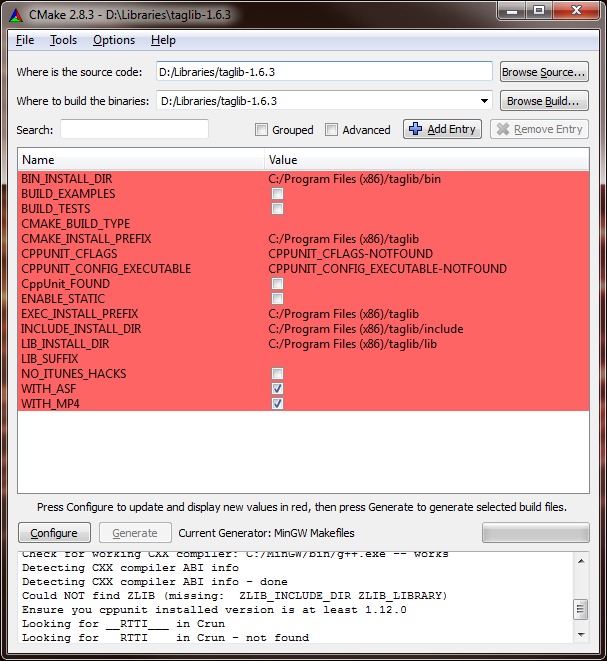
- If it configured properly, there should be some entries (in red) in the main screen. Choose whichever options you like for the build. I enabled ASF and MP4 and had it build the examples (screenshot).
- To disable debug statements put in the TagLib code, change the build type to Release. To do this, check the Advanced check box and type in Release for CMAKE_BUILD_TYPE.
- After you have changed some of the options, press Configure again.
- Note: you will probably get warnings about CppUnit not being found. I wouldn't worry about that.
- Now the Generate button should be enabled. Click on it and it will make the necessary files for you to build TagLib in QtCreator.
Setup the Project
Now that we have all the source files set up, we can build TagLib into the binaries you can use in your projects.
If you have worked with Qt before, then you probably know what a .pro file is. It basically a project file for Qt programs and it tells the compiler (and IDE) what files to include in the project. When you download TagLib from the website and unpack it, you make notice under the taglib directory there is already a .pro file. What the heck?! Well, from my experience it, doesn't work straight out of the box. Frankly, I'm too lazy to figure out why. Instead, I have crafted one that you can use and (with some minor adjustments) should work perfectly.
- Navigate to your base directory of the TagLib source and then go to the taglib subdirectory.
- You'll see the taglib.pro file that I was just jabbering about.
- Now download this .pro file I have been kind enough to make for you. Here it is. Open up the .pro file in the text editor of your choice and do a Find-Replace to set all the paths to write.
- Say you extracted the TagLib source at C:/shared/. Then you would replace all instances of D:/Libraries/ with C:/shared/.
- Thanks to this Stack Overflow post for the original version of the .pro file.
- Replace your revised taglib.pro file with the old one in the taglib subdirectory.
Build TagLib
Finally we have all the moving parts in place. Let's build this thing!- Open up the .pro file QtCreator. It will probably come up with a Project setup window. Just press Finish.
- If everything is in place, you'll see all the header and source files under taglib? in the side bar (screenshot).
- What I did next was build the project under the Release target (screenshot). No need to debug a perfect library!
- Then hit the little hammer icon, to build the project. When it is done, it should have placed the binaries in D:/Libraries/taglib-1.6.3/taglib-release (of course, the D:/Libraries part is just the location of the base TagLib directory, but I didn't need to tell you that).
And there you have it! The header files for the library are under the taglib subdirectory.